Picking Up Color Again in Crochet
How to do Intarsia Crochet
To celebrate the launch of my Puffin Pillow pattern, I'm sharing the teaching for how to do Intarsia Crochet for free!

These are the ii essential things you need to know virtually Intarsia crochet before you brainstorm:
-
A blueprint is created in the fabric by changing yarn/colors multiple times within a row
-
Past post-obit a chart where each square represents a single crochet (like to cantankerous stich), you volition know when to change colors
Here is a unproblematic nautical chart to get y'all started. I've taken a very technical approach to Intarsia crochet which you lot can employ to any chart, including your own designs!

Computing how much yarn you will need
You volition need two balls of orangish and one brawl of white. Nosotros'll telephone call the orange balls #1 and #three and the white brawl #2.
How practise you lot know how much yarn you lot will need in each ball? I have taken a technical approach:
-
Make a swatch with 20 sc and 20 rows (begin with ch 21 and brand kickoff sc in the second ch from your hook). The swatch represents 400 stitches.
-
Counterbalance your swatch. For example, my swatch is 5g.
-
Divide the weight by 4 to calculate your terminal weight ratio. This is how much 100 stitches weighs.
weight ratio = weight of swatch ÷ 4
my case weight ratio: 5g ÷ 4 = 1.25
-
Apply the table below to notice the multiplier* number of each ball. Times that by your ratio, and then round the number upwards. Now you lot have the weight of each ball!
| Multiplier | |
| Ball #one | iii.four |
| Ball #ii | ane.7 |
| Ball #iii | 0.7 |
For example, I volition need 5g in orange ball #1 because…
iii.iv ten 1.25 = four.25
4.25 rounds up to 5g
* Read this if you want to go actually technical! Here is how the multiplier is determined. I've taken the number of stitches you will need to do with the ball. For example, ball #1 volition be used to make 310 stitches. Divide that by 100 (considering your weight ratio is the weight of 100 stitches). So now we get 310 ÷ 100 = 3.i. Merely to be safety I've added a trivial actress on elevation so yous don't run out of yarn. Multiply by 1.i to add together an extra 10%. So now we go three.1 ten 1.1 = 3.iv!
Things to note before you begin:
-
Turning ch does not count as stitch.
-
Odd rows are the right side of your work and even rows are the wrong side.
-
Begin color changes one sew together earlier it is marked in the chart past pulling up the terminal loop of the run up in the new color. This is described in the starting time few Rows.
Reading the chart
Begin with ch 23.
Row 1 with orange #i sc in 2d ch from hook, sc in each ch across, ch ane and turn (22)
The ① in the chart indicates you should brainstorm with ball #1.

Row 2-6 with orange #one sc in each st across, ch 1 and turn (22)

Changing colors in Intarsia Crochet
Color changes in Intarsia crochet are handled in i of ii means:
Color Alter Method 1
Innovate the second colour and drop the first color.
Use this method when working on large blocks of color.
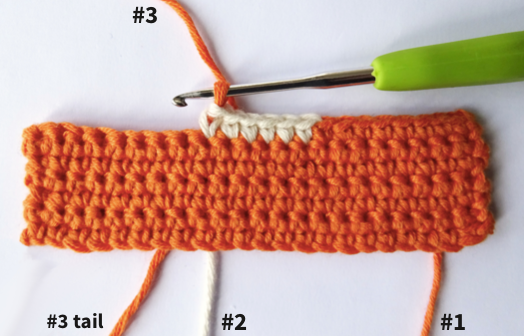
Row seven with orange (#ane) sc in next 7 st, insert claw into next st, yo and pull loop through st, with white (#2) yo and pull through both loops on hook (you have now changed colors), sc with white in side by side 5 st, insert hook into next st, yo and pull loop through st, with 2nd ball of orange (#3) yo and pull through both loops on hook, sc with orange in adjacent 8 st (22)
Notice how the ② indicates where you lot introduce ball #2 and the the ③ indicates where you lot introduce ball #iii.

The photo tutorial highlights the key steps in Row 7. Each strand of yarn is labelled including tails.

with orange (#ane) sc in next seven st, insert claw into next st, yo and pull loop through st, with white (#2) yo...

...and pull through both loops on hook (y'all accept now changed colors)

sc with white in next 5st, insert hook into next st, yo and pull loop through st, with 2nd orange brawl (#iii) yo...
...and pull through both loops on hook

sc with orange in next eight st— that's Row 7 finished!

Here is the behind of Row 7
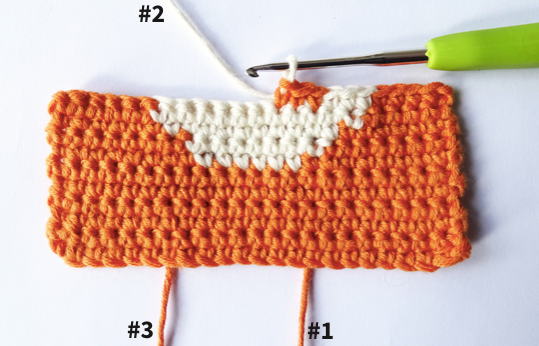
Row 8 with orange (#iii) sc in next six st, insert claw into side by side st, yo and pull loop through st, be certain #three remains on the incorrect side of your piece of work (facing you) when y'all drop it, with white (#2) yo and pull through both loops on hook, sc with white in adjacent vii st, insert hook into side by side st, yo and pull loop through st, be sure #2 remains on the incorrect side of your piece of work (facing y'all) when you drop it, with orange (#1) yo and pull through both loops on hook, sc with orange in adjacent seven st (22)

The photo tutorial highlights the key steps in Row 8. Y'all can run across how the dropped yarn from the previous row is picked back upward in this row.

with orange (#3) sc in side by side vi st, insert hook into adjacent st, yo and pull loop through st, exist sure #3 remains on the wrong side of your work (facing yous) when you lot driblet information technology, which white (#ii) yo...

...and pull through both loops on the hook

sc with white in adjacent 7 st, insert hook into next st, yo and pull loop through st, be sure #2 remains on the incorrect side of your work (facing y'all), with orange (#1) yo...

...and pull through both loops on claw, sc with orangish in adjacent 7 st— that'southward Row viii finished!
Row 9 with orange (#i) sc in next five st, insert hook into next st, yo and pull loop through st, with white (#2) yo and pull through both loops on hook, sc with white in next nine st, insert hook into side by side st, yo and pull loop through st, with orange (#3) yo and pull through both loops on hook, sc with orangish in next 6 st (22)

Row ten with orange (#3) sc in next 4 st, insert hook into next st, yo and pull loop through st, be sure #iii remains on the incorrect side of your work (facing you) when you drib it, with white (#2) yo and pull through both loops on hook, sc with white in adjacent eleven st, insert hook into side by side st, yo and pull loop through st, be sure #2 remains on the wrong side of your work (facing you) when yous driblet it, with orange (#one) yo and pull through both loops on hook, sc with orangish in next v st (22)

Let's review color change method 1:
-
This is the main way we volition change colors.
-
When a second color is introduced drop the first color. The yarn that you lot dropped will exist picked support in the next row.
-
On even rows the incorrect side will be facing you. Be sure yous drib the yarn on the side facing you lot. If yous exit the yarn on the side facing abroad from you, and then that ways your yarn volition exist stuck on the front side of your work!
-
You will need to occasionally untwist your yarn.
Color Change Method 2
Innovate the 2nd color and float the first colour.
Employ this method when working in areas with frequent color changes.
From now on, the instructions will not fully explain the color changes. When y'all are instructed to change colors you will demand to recollect that in the stitch before the colour change: insert claw into st, yo and pull loop through st, with [adjacent colour] yo and pull through both loops on hook.
Row 11 with orange (#one) sc in next 4 st, with white (#2) sc in side by side three st, picking up orangish (#1) again (orange #i is now floated behind the white) sc in side by side iii st, picking up white (#ii) again (white #2 is now floated behind the orange) sc in next viii st, with orange (#three) sc in adjacent 4 st (22)
The numbers in the chart permit yous know which ball y'all should use in each department. The reason why this is provided in Row 11, but not in previous rows is that balls #1 and #ii are at present existence used twice in a single row.

The photo tutorial highlights the key steps in Row 11.

with orange (#ane) sc in next 4 st, with white (#2) sc in next 3 st, picking upwards orangish (#one) over again...

Here's a quick peek of the wrong side, (orange #1 is now floated behind the white)
sc in adjacent iii st, picking up white (#2) again...

Here'southward a quick peek of the wrong side, (white #2 is now floated backside the orange)

sc in next 8 st, with orange (#iii) sc in next 4 st— that'southward Row 11 finished!

Here's the wrong side of row eleven.
Row 12 with orange (#3) sc in side by side 4 st, with white (#2) sc in next 7 st, with orange (#1) sc in next 3 st, picking upwardly white (#2) once again (white #2 is now floated behind the orange) sc in next iv st, picking up orange (#i) again (orange #one is at present floated behind the white) sc in adjacent 4 st (22)

Row 13 with orangish (#1) sc in adjacent 4 st, with white (#2) sc in next 4 st, picking upwardly orange (#1) again (orange #1 is now floated behind the white) sc in adjacent 4 st, picking up white (#2) once again (white #2 is at present floated behind the orangish) sc in adjacent 6 st, with orangish (#three) sc in adjacent 4 st (22)

Row fourteen with orangish (#3) sc in next 4 st, with white (#2) sc in adjacent 6 st, with orangish (#1) sc in next 3 st, picking upward white (#2) again (white #2 is now floated behind the orangish) sc in adjacent five st, picking up orange (#i) over again (orange #1 is at present floated backside the white) sc in next four st (22)

Row xv with orangish (#1) sc in next 5 st, with white (#ii) sc in next 4 st, picking upwardly orange (#ane) again (orange #1 is now floated behind the white) sc in next 3 st, picking up white (#2) over again (white #2 is now floated backside the orangish) sc in next 5 st, with orange (#3) sc in next 5 st (22)

Row 16 with orange (#3) sc in next 6 st, with white (#2) sc in next 4 st, with orange (#i) sc in adjacent iii st, picking up white (#ii) again (white #2 is at present floated behind the orangish) sc in next 3 st, picking up orange (#i) again (orangish #i is now floated behind the white) sc in side by side 6 st (22)

Row 17 with orangish (#1) sc in next seven st, with white (#ii) sc in adjacent 2 st, picking up orange (#i) once again (orange #1 is now floated backside the white) sc in next iii st, picking upward white (#2) again (white #2 is now floated behind the orange) sc in side by side iii st, with orangish (#iii) sc in next 7 st (22)

Row 18 with orange (#3) sc in side by side eight st, with white (#2) sc in side by side ii st, with orangish (#i) sc in adjacent three st, picking upward white (#2) again (white #ii is now floated behind the orangish) sc in next ane st, picking upward orange (#1) once more (orange #1 is now floated behind the white) sc in side by side 8 st (22)
The ➌ and ➋ signal the end of those balls. You can now cut the yarn of orange #3 and white #2 because you are finished using them.

Allow'due south review colour change method 2:
-
Use this method when at that place aren't that many stitches between the aforementioned colour.
-
When a color is used more than once in the same row, bladder the yarn in the dorsum of your work. To float a yarn, drop the ball when you modify color. Then when you change color back to the color you lot dropped, only pick it back up.
Rows xix-21 sc each st across, ch 1 and turn (22)
Row 22 sc in each st beyond, cutting yarn (22)


Finished!

Here's the wrong side
All done! Like I said, it's a pretty technical method, just hopefully you lot can go forth and use what you learned and apply information technology to any design. Why not give the puffin a try?
Source: https://www.alysonchu.com/blog/2020/5/8/how-to-do-intarsia-crochet-1
0 Response to "Picking Up Color Again in Crochet"
Post a Comment